BlueROV2 Software Setup
This guide walks through the first-time software setup for your BlueROV2, from connecting your vehicle to your computer to getting up and running in Cockpit.
It covers:
- A brief overview of the BlueROV2 software system
- Connecting everything to your computer
- Configuring your network settings
- Setting up the ROV in BlueOS
- Installing Cockpit
Before you begin:
- Make sure your ROV is fully assembled. If it isn’t, complete the assembly guide first.
- You’ll need access to a strong, stable Wi-Fi network. Networks with captive portals (like campus or public Wi-Fi login pages) are not supported.
- If you have an older BlueROV2 that uses a Pixhawk and the Companion system, consider updating! Or use the companion-specific version of this guide instead.
The BlueROV2 Software Stack
There are three main components that make up the BlueROV2 software system. Understanding how these work together will make maintaining, customizing, and troubleshooting your ROV easier.
BlueOS – runs on the onboard computer inside the vehicle (the Raspberry Pi). It is the vehicle operating system that manages all the processes running on the ROV.

Through BlueOS, you can:
- Access the vehicle over a web browser
- Configure vehicle settings and parameters
- Configure networking, video streams, and peripherals
- Manage onboard services and extensions
- and more
ArduSub – is the flight control firmware and one of the processes running on the onboard computer. It’s the control system that governs how the ROV moves and responds to commands.

It handles things like:
- Processing sensor input (IMU, pressure sensor, compass, etc.)
- Flight stabilization, holding depth and heading automatically
- Translating pilot input into thruster output
Cockpit – is the user interface you interact with to pilot the ROV, referred to generally as your “ground control station” software. This is software that you will install on your computer later.

With Cockpit you can:
- Pilot the ROV
- View live video from the ROV
- Monitor vehicle telemetry
- Control lights, cameras, and some accessories
- Create a fully customized interface
- and more
Recommended System Requirements
For your topside computer (the computer you’ll be using to run Cockpit and control the ROV), we recommend a medium to high-end computer running Windows 11, macOS, or Linux. Many handheld systems, like the Steam Deck or Lenovo Legion series, also work very well. Android and iOS are not officially supported at this time.
Your computer should meet the following requirements for the best experience:
| Component | Requirement |
|---|---|
| Operating System | |
| Windows | Windows 11 (64-bit) or newer |
| macOS | macOS 11 (Big Sur) or newer |
| Ubuntu | 20.04 LTS or newer |
| Hardware ¹ | |
| CPU | Core i5 equivalent from last 5 years or better |
| Graphics | Dedicated GPU Modern systems with performance integrated graphics are also suitable (Apple Silicon M series, Radeon 7xxM series, etc.) |
| Memory | 8 GB RAM (16 GB or more if running multiple applications) |
| ¹ Software performance will depend on the system environment and available system resources. More capable hardware will provide a better experience. | |
Topside Hardware Setup
Before setting up your software, you’ll need to connect your hardware, including the topside computer. “Topside” refers to any equipment that stays on the surface during operation. This section walks you through connecting your topside equipment, as well as the ROV-side connections (battery, tether) needed to power the system on before moving to the software steps.
Power on the BlueROV2
Here we will open the battery enclosure to connect the battery. The ROV will turn on as soon as you connect the battery, there isn’t any power switch to turn it on or off.
1. Locate the battery enclosure underneath the larger electronics enclosure. Remove the Pressure Relief Valve (PRV) plug from the bulkhead by turning it counterclockwise.
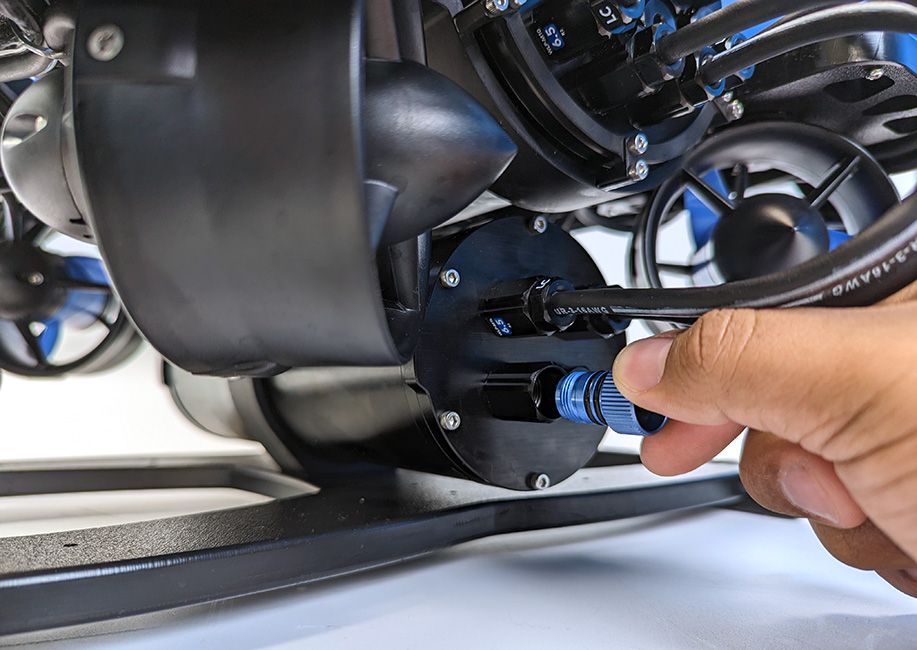
The plug is the top blue portion of the PRV.
2. Pull out the locking cord.
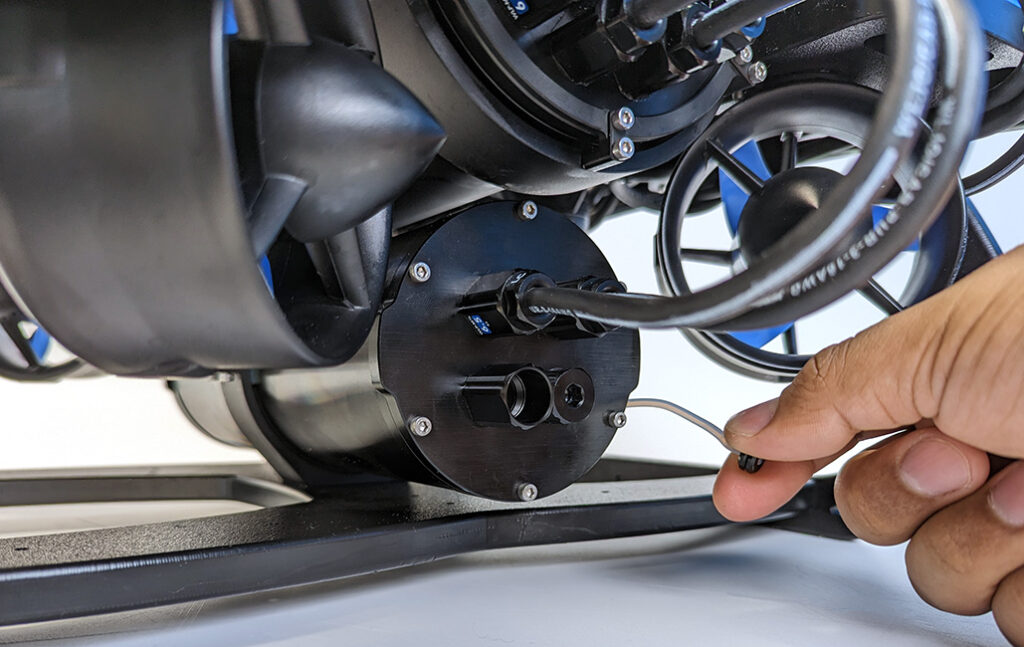
3. Grip the end cap and pull it out to open the enclosure. Do not pull directly on the power cables.
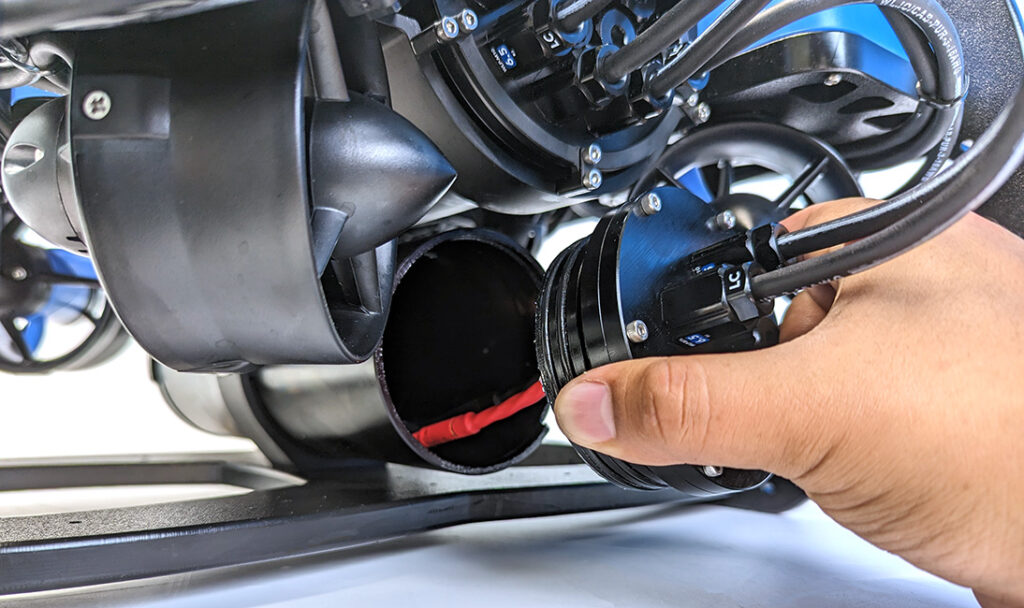
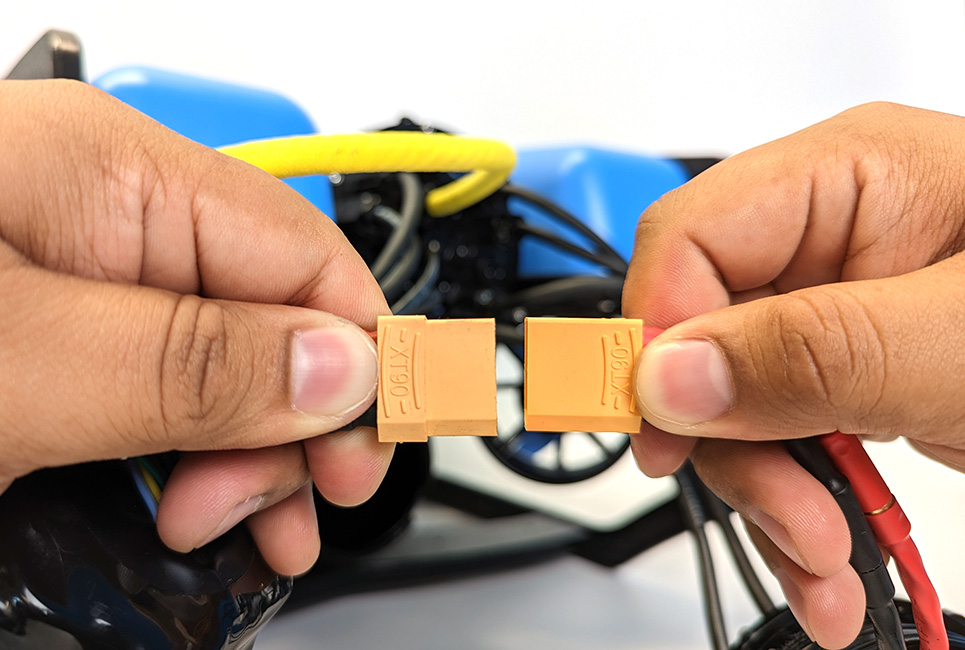
4. Connect the XT90 connector from the battery to the XT90 connector on the power cable, then place the battery inside the enclosure.
5. Close the battery enclosure:
- Push the end cap back into the tube until it is fully seated.
- Insert the locking cord through the slot.
- The locking cord should slide in easily. If it’s getting jammed, it’s usually because the end cap is not aligned correctly and not fully seated.
- Reinstall the PRV plug and turn it clockwise until snug.
Connect the Fathom-X Tether Interface
The Fathom-X Tether Interface (FXTI) is the small blue box included with your ROV. It converts the tether signal back to Ethernet and connects it to your topside computer.
Connect the end of the tether to the FXTI. If you are using the Fathom Spool, you’ll use the included extension cable to connect it to the FXTI.
1. Line up the white arrow on the tether connector with the white line on the FXTI receptacle.
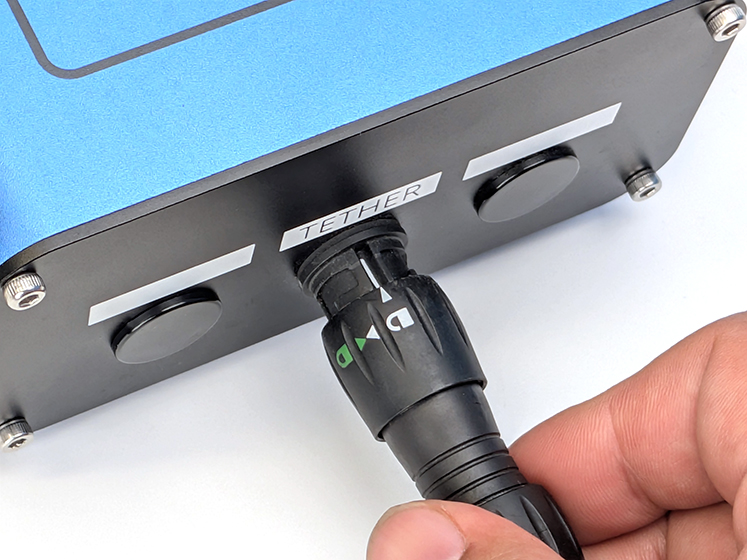
2. Push the connector fully in, then rotate the locking ring clockwise until it locks and the green lock symbol is in the locked position.
- If the connector doesn’t push in easily, try rotating the locking ring counterclockwise first to make sure it’s in the unlocked position.
3. Use the included USB-A to USB-B cable to connect the FXTI to your topside computer.
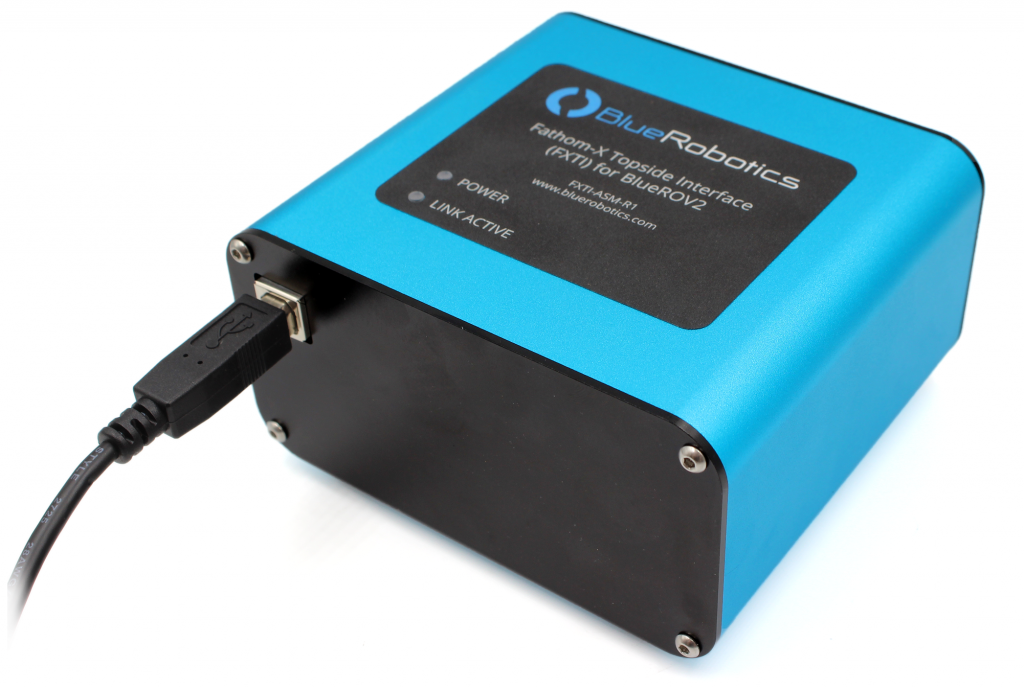
4. Once connected, wait around 20 seconds then check the status of the POWER and LINK ACTIVE lights, both should be on to indicate a good connection.
Troubleshooting
- If the POWER light is not on:
- Check the USB connection between the FXTI and your computer
- If the LINK ACTIVE light is not on:
- Make sure the ROV is powered on
- Check all tether connections between the ROV and FXTI
- If you are using the Fathom Spool, check that the extension cable is connected securely
- Verify the Fathom-X board inside the ROV is powered (POWER LED on)
- Verify the blue and white wires from the tether are connected to the Fathom-X tether interface inside the ROV
If the problem persists, contact our technical support team for more help.
Network Setup
Once connected to your computer, the FXTI appears as a USB network adapter. Network setup involves assigning the static IP address 192.168.2.1 to this adapter. Instructions for Windows, macOS, and Linux are below.
Windows
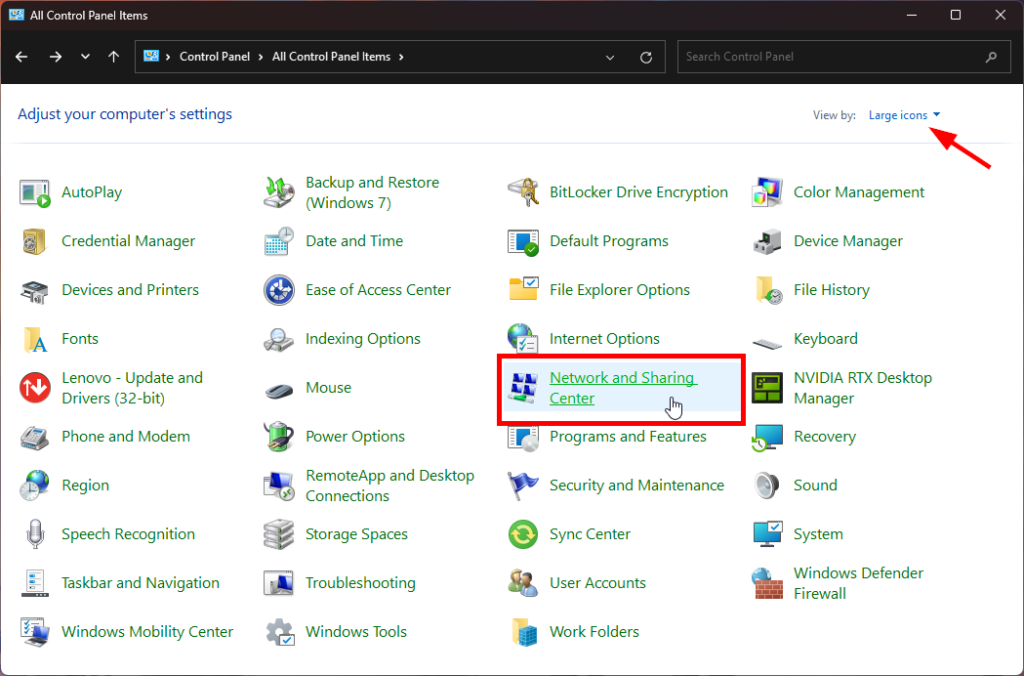
1. Open the Windows Control Panel then select Network and Sharing Center. If you don’t see Network and Sharing Center, change the View by: option to large or small icons.
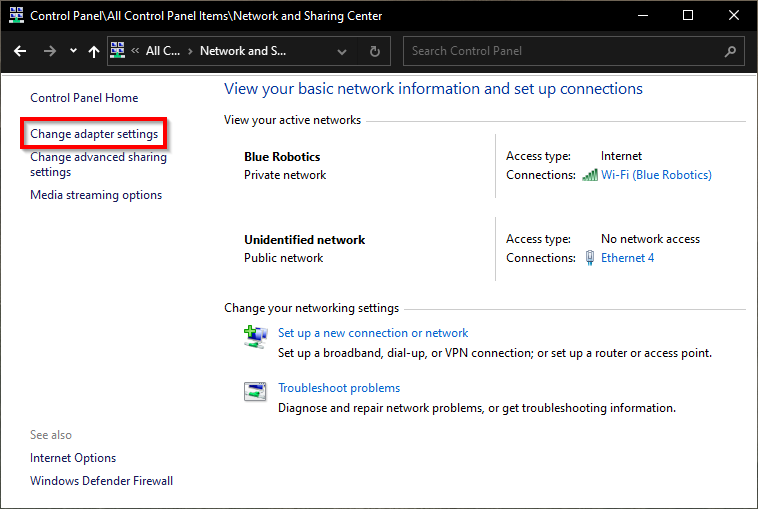
2. In the Network and Sharing Center window, select Change adapter settings.
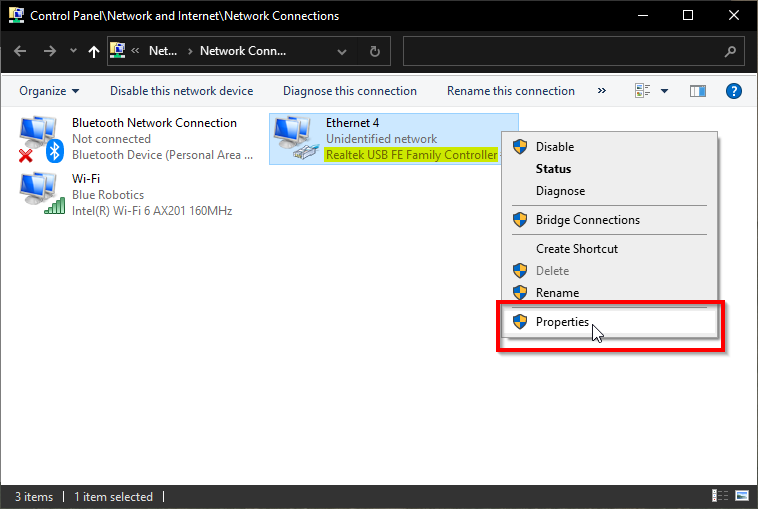
3. The FXTI will show up as an Ethernet device in this menu. It should be displayed as Realtek USB FE Family Controller. Right click on this Ethernet adapter then choose Properties.
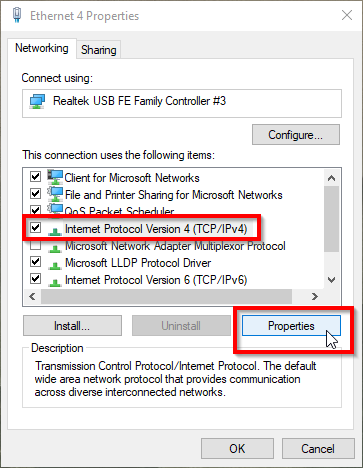
4. In the properties dialog, click on Internet Protocol Version 4 (TCP/IPv4) to highlight it, then click Properties.
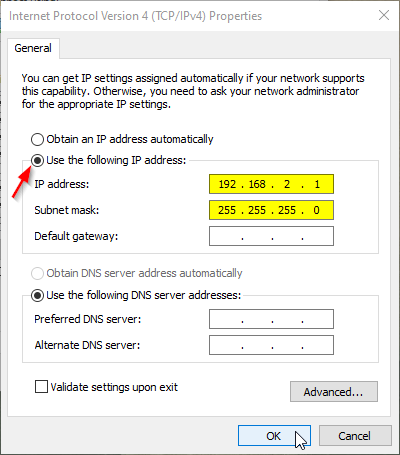
5. Select Use the following IP address And enter 192.168.2.1 for the IP address and 255.255.255.0 for the Subnet mask. Select OK. You can then exit this menu.
macOS
1. Open System Settings then select Network.
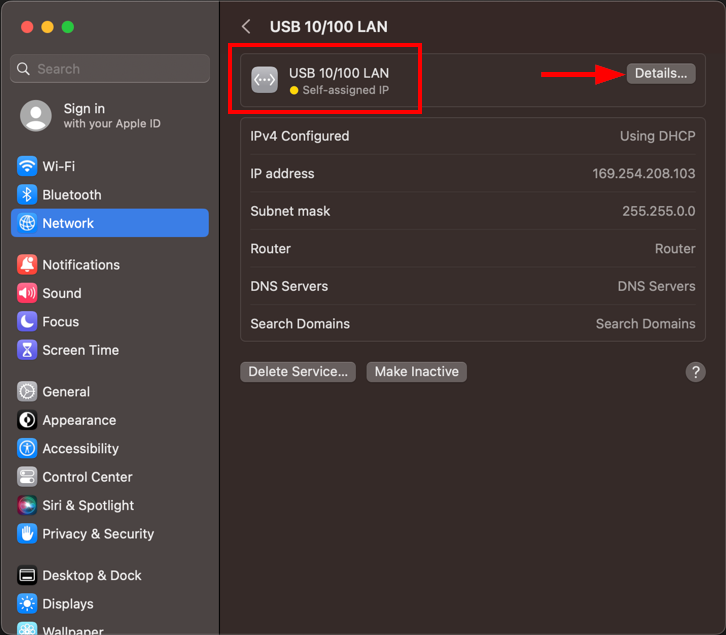
2. The FXTI is displayed as USB 10/100 LAN in the Network screen. Select it then choose Details….
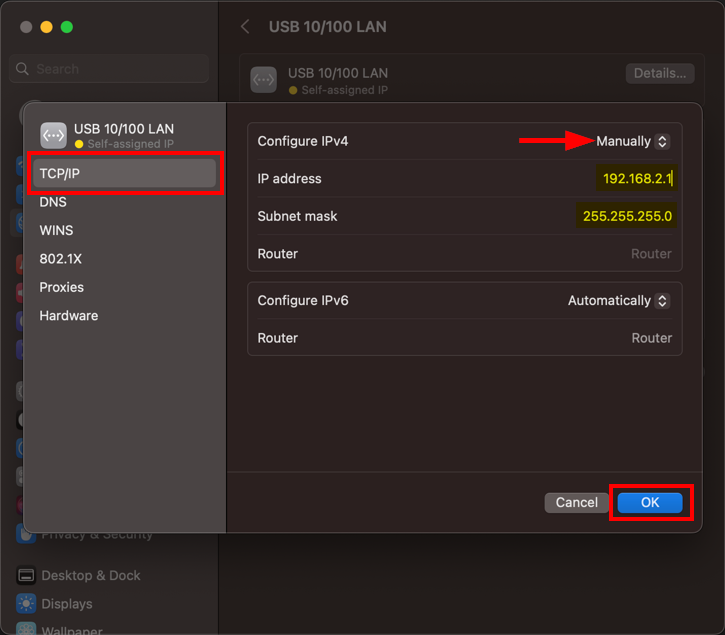
3. In the next menu, select TCP/IP. Set the Configure IPv4 setting to Manually then enter 192.168.2.1 for the IP address and 255.255.255.0 for the Subnet mask and then select OK. You can then exit this menu.
Linux
1. Open Settings then select Network.
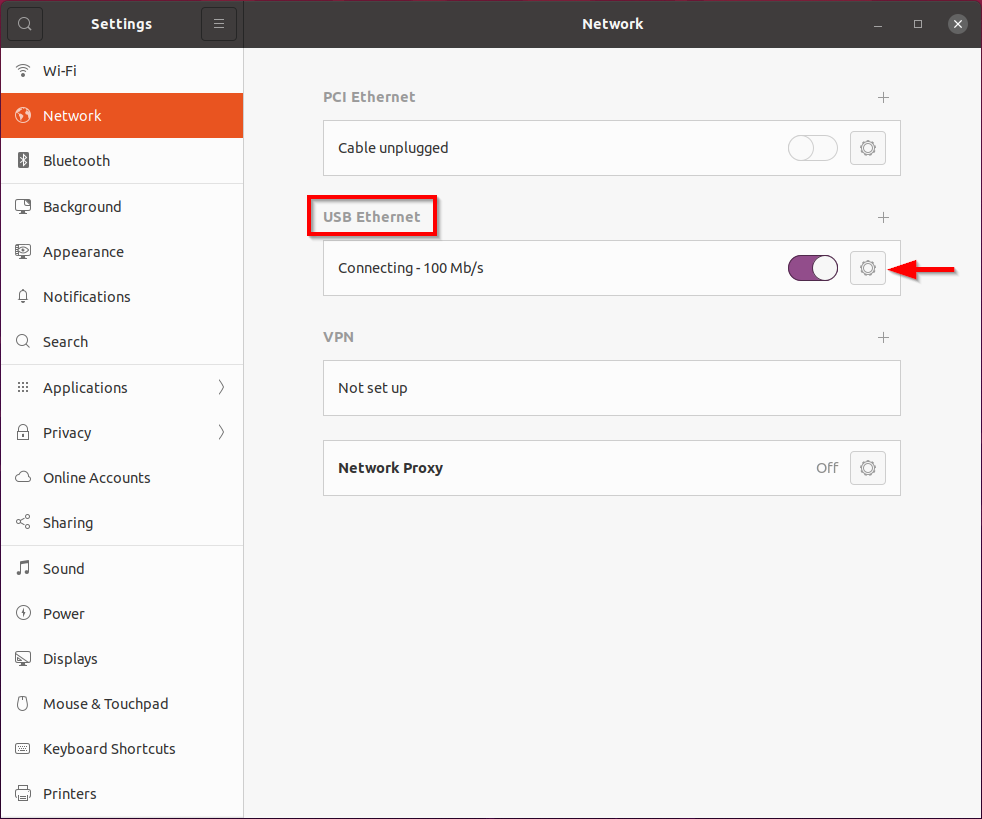
2. The FXTI is displayed as “USB Ethernet” in this menu, choose the settings icon next to it.
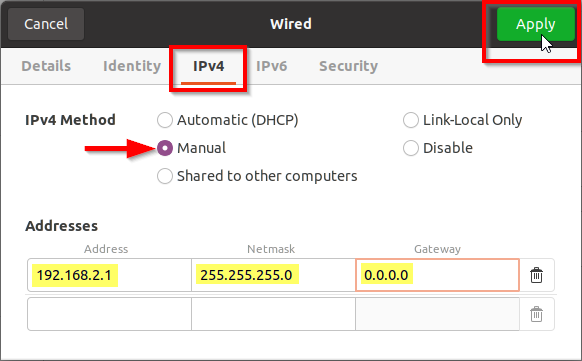
3. Select the IPv4 Settings tab, select Manual for the IPv4 Method setting, enter 192.168.2.1 for Address, 255.255.255.0 for Netmask and 0.0.0.0 Gateway. Click Apply to complete the setup.
Access BlueOS
With your BlueROV2 powered on and your network settings configured correctly, you’re ready to connect to BlueOS. To access it:
1. In a web browser window, type 192.168.2.2 or blueos.local in the browser address bar. The very first time the BlueROV2 is powered on, it may take a couple of minutes until it is fully booted up and ready to connect. If the page does not load right away, give it a minute or two and try again.
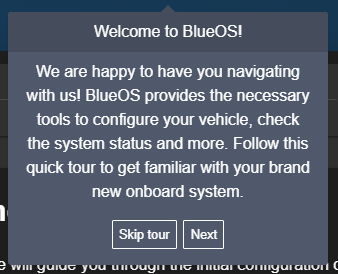
2. Once the BlueOS web page loads, you’ll be greeted with a short welcome tour that shows you where to connect to the internet. You can skip it if you want, as you’ll be using the wizard in the next step to connect to the internet.
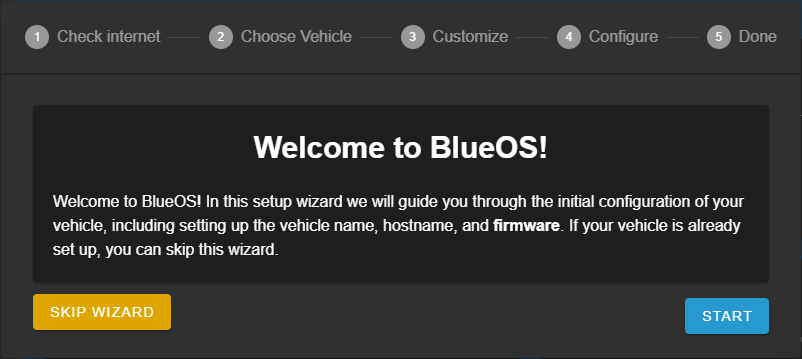
3. The vehicle setup wizard will help you connect to a wireless network and update vehicle firmware. Go ahead and select START to begin the wizard.
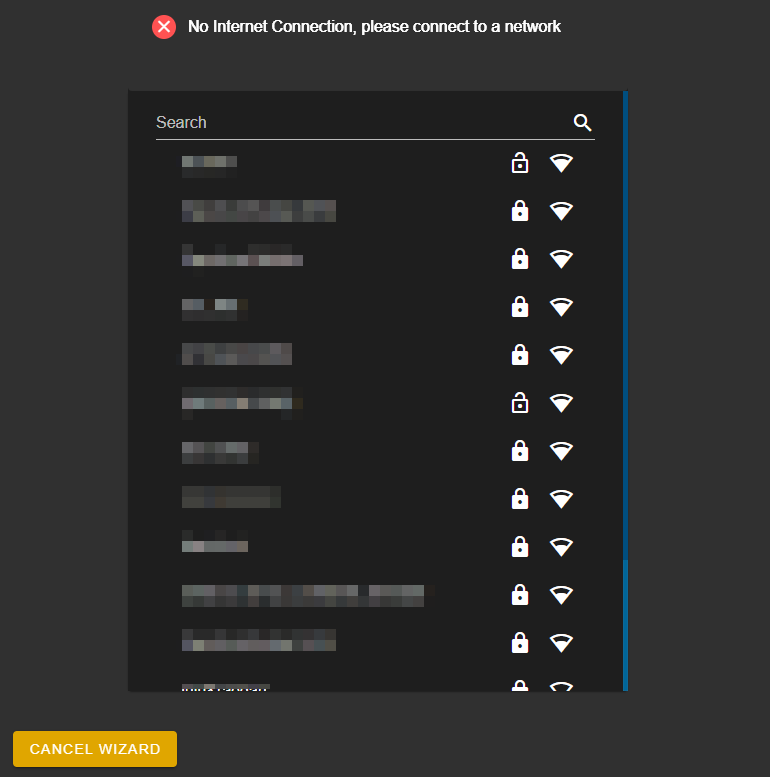
4. Select the wireless network you want to connect to from the list and enter its password to connect.
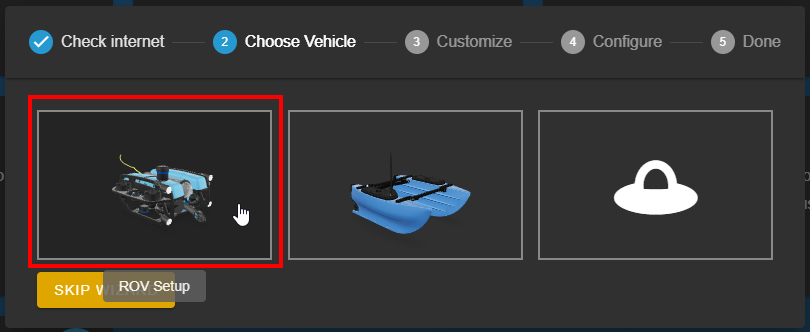
5. On the next screen, choose ROV setup.
6. On the next screen you can give your ROV a unique name and change the MDNS name (optional).
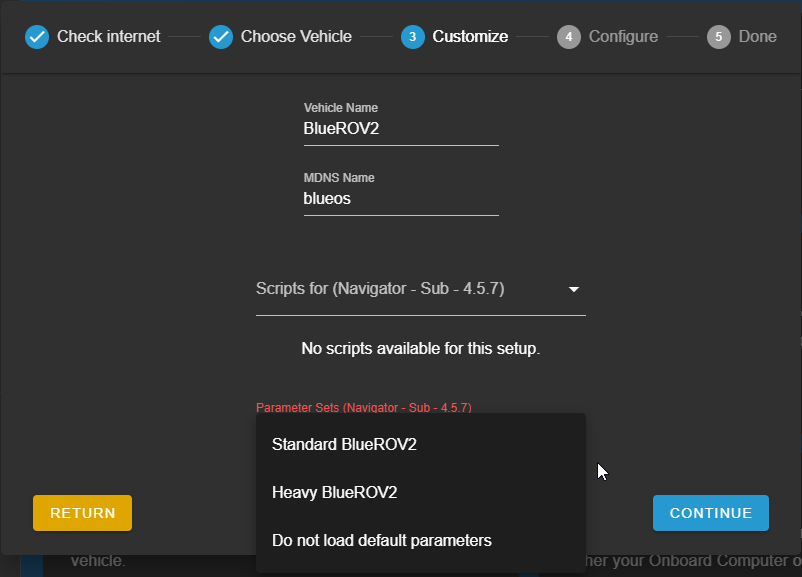
The MDNS name is the hostname that you can use to access BlueOS instead of the IP address (192.168.2.2). For example, if you change the MDNS to “myrov”, you would access the ROV using “myrov.local” in the browser address bar. This is optional, you can leave the default MDNS of blueos.local.
Leave the Scripts dropdown empty (there are none) and choose the parameter set for the type of BlueROV2 you are setting up:
- Choose Standard BlueROV2 for a regular 6-thruster ROV
- Choose Heavy BlueROV2 for an 8-thruster ROV using the Heavy Kit
Choose CONTINUE and apply to set all the settings and finish the wizard.
8. If you are connected to the internet, you should get a notification that a new BlueOS version is available.
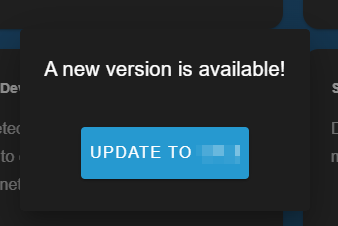
Select the notification or select BlueOS Version from the left sidebar and choose UPGRADE TO to update.
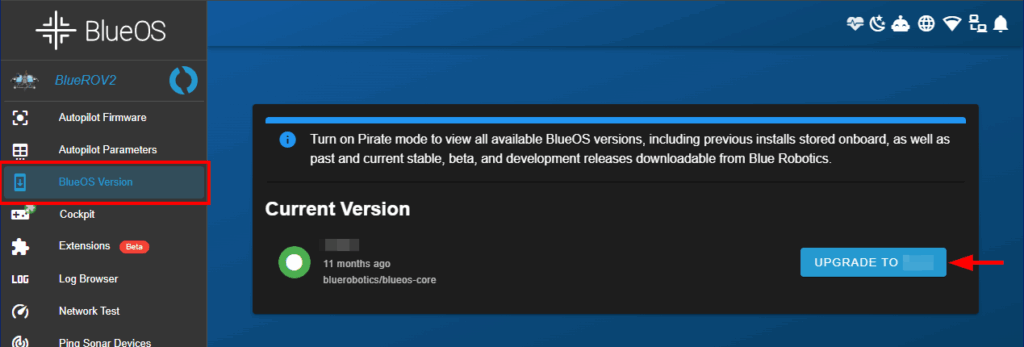
To follow along with the rest of this guide, your BlueOS version must be 1.4.5 or later.
Vehicle Setup
For a new ROV, you’ll need to calibrate its accelerometer and compass sensors and configure motor (thruster) directions. All the following pages are accessed from the Vehicle Setup > Configure menu in BlueOS.
Calibrate Accelerometer
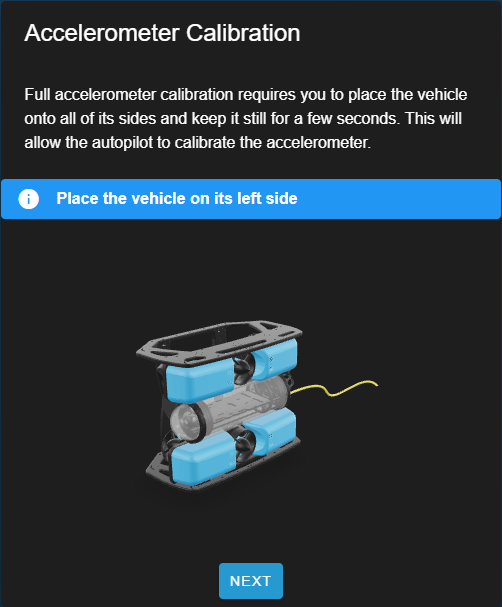
The process to calibrate the accelerometer will have you picking up and holding the ROV in various positions. It’s helpful to have another person to help either hold the ROV or click through the menu.
1. From Vehicle Setup in BlueOS, go to CONFIGURE then ACCELEROMETER.
2. Choose START FULL CALIBRATION to begin.
3. Follow the onscreen instructions to calibrate. Make sure to hold the ROV still while it calibrates each position.
Calibrate Compass
The process to calibrate the internal compass will have you picking up the ROV and spinning it around all of its axes. The quality of the calibration can be affected by nearby ferrous metals. If the calibration results are poor, try performing the calibration outside or away from large buildings or metal structures.
1. From Vehicle Setup in BlueOS, go to CONFIGURE then COMPASS.
2. Choose Full (Onboard) Calibration then START FULL CALIBRATION.
3. Choose USE GEOIP COORDINATES and start calibration.
4. Spin the ROV around, making sure to move about all the axes, e.g., spin it forwards, backwards, sideways, roll it, etc. Keep spinning it until the progress bar reaches completion.
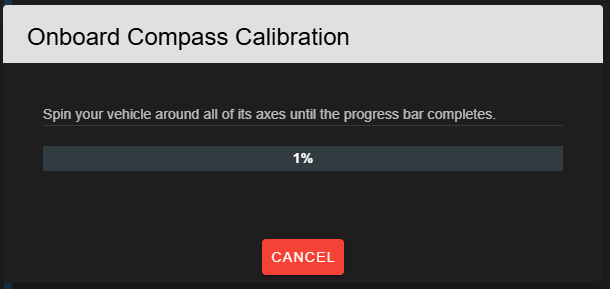
5. You’ll be prompted to reboot the autopilot when you are done.
Configure Motor Directions
The forward and backward direction of the thrusters (motors) needs to be determined for the ROV to fly correctly. When they are not configured correctly, the ROV will fly erratically or spin and flip around in stabilized and depth hold flight modes.
Motor direction detection can be done either automatically by the ROV software or manually by you:
- Automatic detection – the ROV will run a routine to activate each thruster individually and automatically detect the direction from the resulting movement. You need to have access to a calm body of water for the ROV to float in to perform this check.
- Manual detection – you will activate each thruster one by one and determine its direction from the direction the air is moving. This can be done anywhere.
Choose a method and follow its instructions below.
Automatic detection
Before starting:
- Make sure the ROV is properly ballasted for neutral buoyancy (or very close to it). The ROV needs to be floating freely in the water, not sunk to the bottom.
- The water needs to be calm and the ROV needs enough room to move slightly without bumping into walls or other objects. Make sure the tether has a bit of slack so that it can move freely.
1. From Vehicle Setup in BlueOS, go to PWM OUTPUTS.
2. Place the ROV in the water and make sure hands and body parts are clear of the thrusters.
3. Select DETECT REVERSED MOTORS. Read the instructions then choose START DETECTION to begin the routine.
4. The results of each check are displayed as it runs through the routine.
- If the checks are successful, you’re all set!
- If the routine fails, some troubleshooting steps are displayed with an option to retry the test.
- If the test fails consistently at the same thruster, it usually means that its installed in the wrong location on the frame, for example, you have thruster #1 in the thruster #5 spot or connected to the wrong ESC. Double check everything is correct according to the assembly instructions.
Manual detection
Before starting:
- Make sure all people, pets, and objects are clear of the thrusters before checking motor directions!
- Do not allow the thrusters to spin at high speed while dry for more than a few seconds at a time. The bearings require water for lubrication and may be damaged if the motor is operated for an extended period of time while dry.
- You do not need to lubricate the thrusters.
- A clicking sound or noisy thruster is normal, especially when operated while dry. Most noise and vibration go away once the motors are operated in water.
1. From Vehicle Setup in BlueOS, go to PWM OUTPUTS.
2. When you are ready to begin testing, arm the ROV using the onscreen toggle.
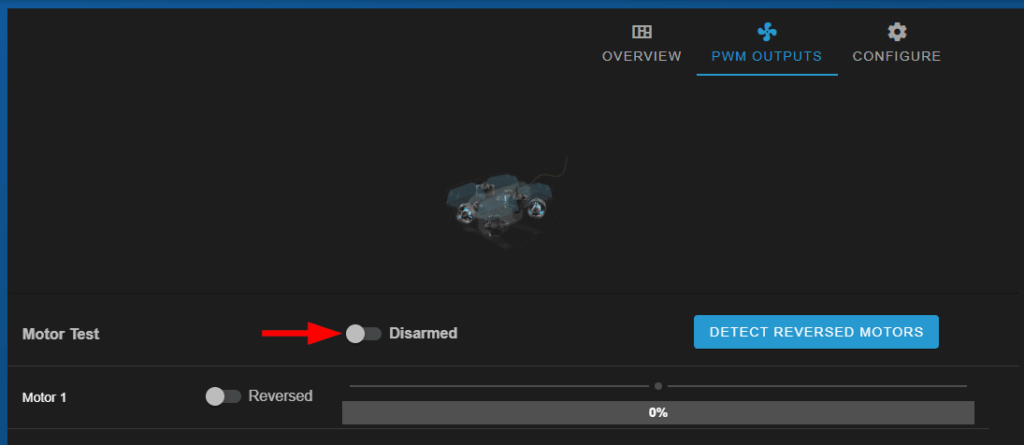
3. Starting with Motor 1, move the center circle on the slider to the right to activate the thruster and make it spin. You are checking two things:
- Location: Check that the thruster spinning on the ROV matches the location indicated either on the onscreen ROV in BlueOS or the diagram below. If it isn’t, double check everything is connected according to the assembly instructions.
- Direction: Place your hand in front of the thruster in the direction of the blue arrow shown in the diagram below (don’t touch the thruster itself) and feel the direction the thruster is pushing air. If the direction of the air matches the arrow, the thruster is spinning correctly, and you can leave it alone. If the air is blowing the other way, reverse the direction by enabling the Reversed toggle next to the slider, then check the thruster again, the air should now be blowing in the correct direction.
Standard BlueROV2
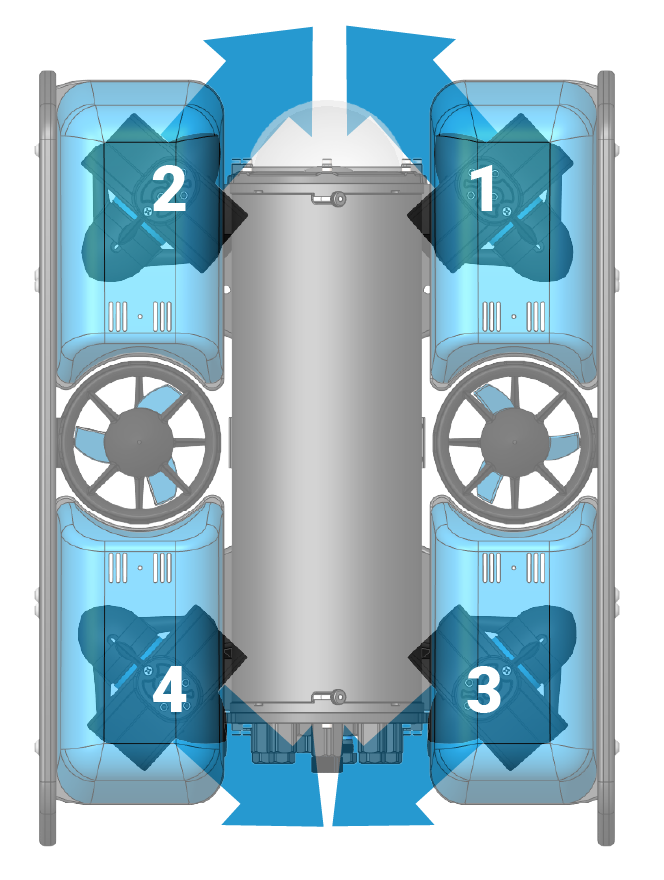
Horizontal thrusters, viewed from top.
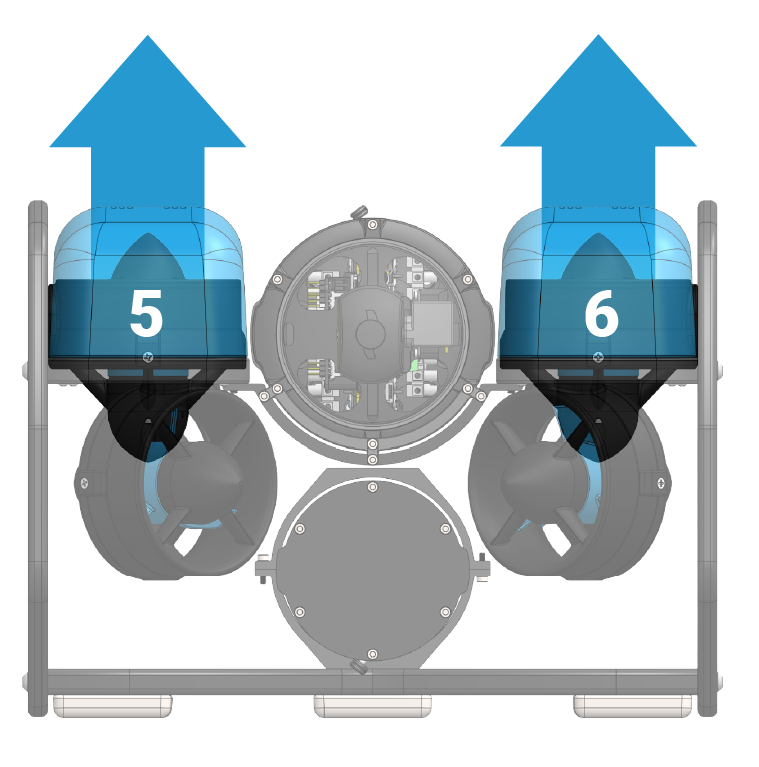
Vertical thrusters, viewed from front.
BlueROV2 Heavy
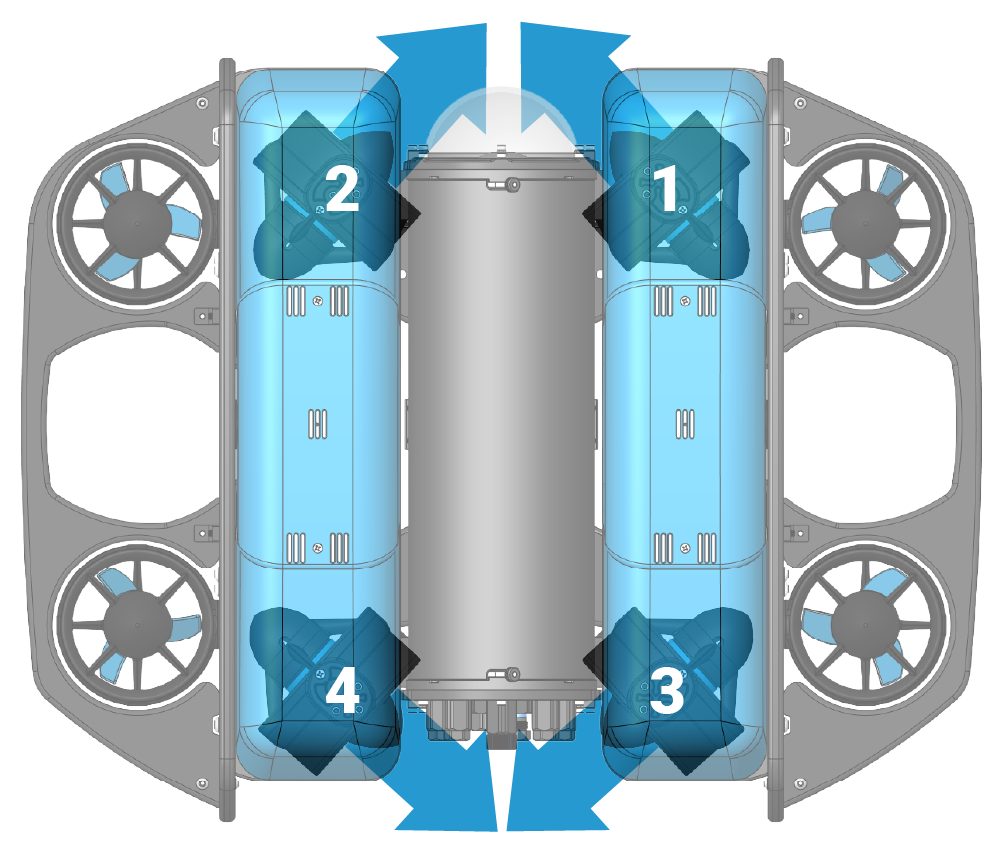
Horizontal thrusters, viewed from top.
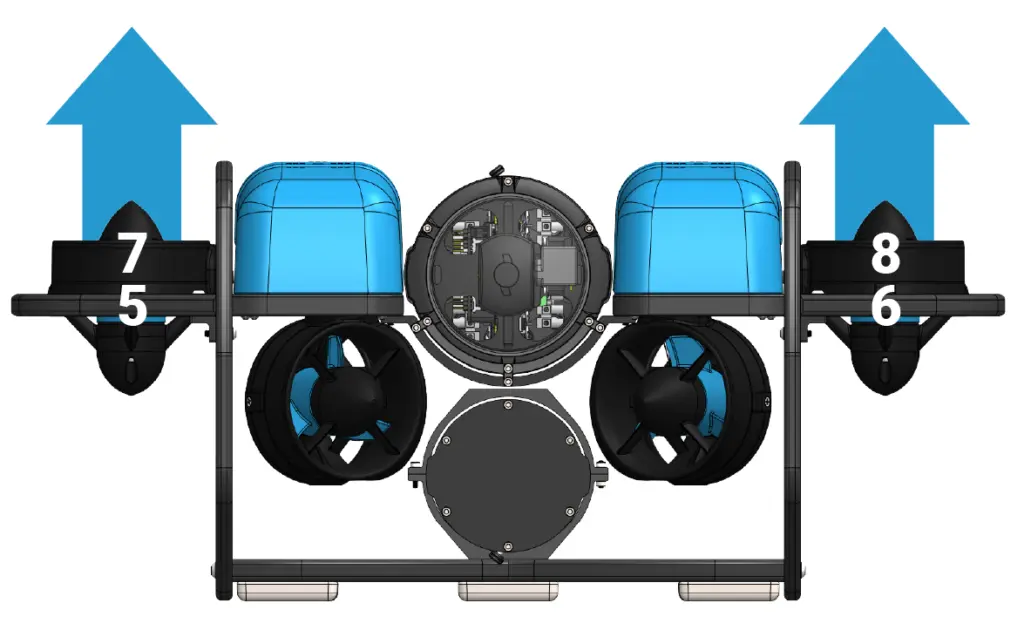
Vertical thrusters, viewed from front.
4. Perform the same check with the remaining thrusters.
Install Cockpit
Cockpit is the software you’ll use to control the ROV and view the camera stream. It’s available in two versions:
- Cockpit standalone – this is a standalone (desktop) application and has the full set of features that Cockpit has to offer. It gets installed on your topside computer. We recommend using this version.
- Cockpit Lite – is the BlueOS extension version. It is installed on the ROV and accessed through a web browser on your computer. Because it runs in a web browser, it doesn’t have the full set of features as the full standalone version.
For this guide, we’ll install and use the full standalone version. Download the correct installer from the table below:
| Operating System | Download Link |
|---|---|
| Windows | Cockpit.exe |
| Mac (Apple Silicon M1/M2/M3/M4) | Cockpit-M-series.dmg |
| Mac (Intel processors) | Cockpit-intel.dmg |
| Linux (AppImage) | Cockpit-x86_64.AppImage Cockpit-arm64.AppImage |
| Linux (flatpak) | Cockpit-x86_64.flatpak (Steam Deck) Cockpit-arm64.flatpak |
Depending on your operating system and network configuration, you may need to allow Cockpit through your firewall for it to connect properly. Refer to your operating system or firewall documentation if you run into connection issues.
Controller Setup
The Xbox Wireless Controller is our preferred controller, but Cockpit supports most standard controllers, feel free to use one you’re already comfortable with.
Whatever controller you are using, connect it to your topside computer now. Refer to your controller’s documentation for pairing instructions. Some helpful links for Xbox controllers are provided below:
- Xbox Wireless Controller OS compatibility
- Xbox Wireless Controller connect to Windows
- Xbox Wireless Controller connect to Apple device
Launch Cockpit
Cockpit is a powerful, highly customizable ground control station. This section won’t cover everything it can do — just enough to get you started. For a more in-depth look, head over to the Cockpit docs when you’re ready.
1. Launch Cockpit from your topside computer. If everything is connected correctly and you’re using the default network settings, Cockpit will automatically connect to the ROV.
2. Take the welcome tour to learn about the main parts of the Cockpit interface.
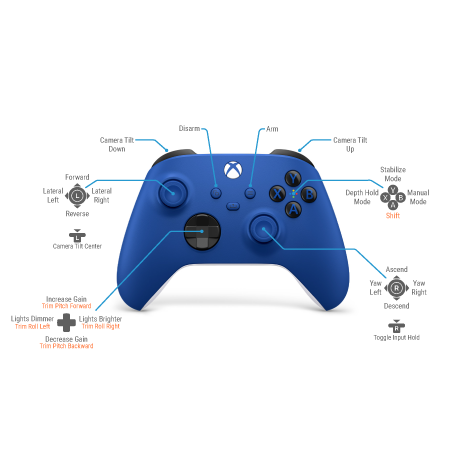
Controller Button Setup
The default button layout for the BlueROV2 is shown below:
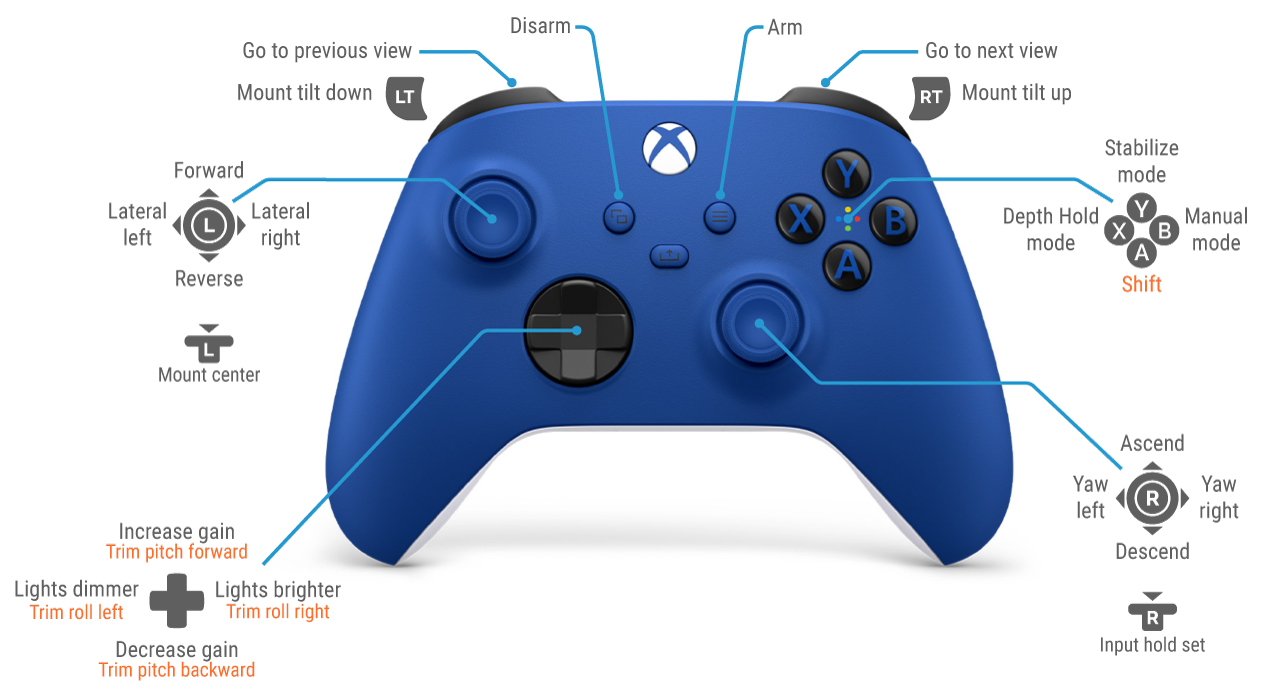
If you’ve never operated an ROV before, we recommend trying the default layout first to get a feel for it before making changes. Once you know what you want to change, buttons can be reconfigured from the Joystick configuration page in Cockpit.
1. Open the Cockpit menu, then go to Settings > Joystick.
2. A visual representation of your controller is shown on screen, pressing a button or moving a stick on your controller highlights it on screen.
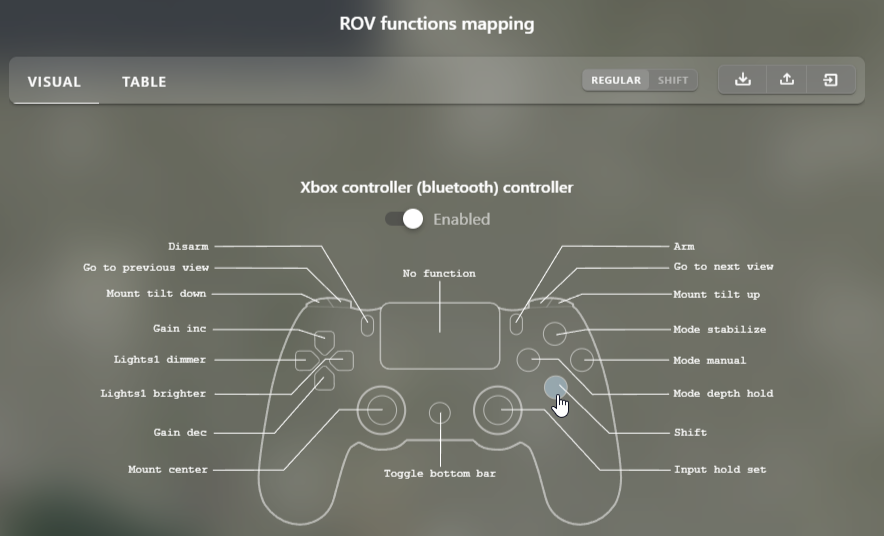
3. Button functions are shown in two layers: REGULAR and SHIFT.
- Regular layer – the function triggered when you press the button normally.
- Shift layer – a second function for the same button, triggered when you hold the Shift button and press it.
4. Choose a button you want to change, then choose its new function from the list. Not all listed functions are supported by the vehicle. A list of the most common functions and what they do is below. It’s not a complete list of every supported function, most advanced functions are left out for simplicity.
| Function Name | Action |
|---|---|
| Arm | Arms the vehicle |
| Disarm | Disarms the vehicle |
| Shift | Activates the controller shift layer while button is held |
| Mode manual | Changes flight mode to manual |
| Mode depth hold | Changes flight mode to depth hold |
| Mode stabilize | Changes flight mode to stabilize |
| Mode position hold | Changes flight mode to position hold (positioning system required) |
| Mount tilt down | Tilts camera down |
| Mount tilt up | Tilts camera up |
| Mount center | Moves camera to center |
| Go to previous view | Switches to previous Cockpit view |
| Go to next view | Switches to next Cockpit view |
| Lights1 brighter | Increases lights1 brightness by 1 step |
| Lights1 dimmer | Decreases lights1 brightness by 1 step |
| Gain inc | Increases pilot gain by 1 step |
| Gain dec | Decreases pilot gain by 1 step |
| Trim pitch inc | Pitches vehicle forward (Heavy only) |
| Trim pitch dec | Pitches vehicle backward (Heavy only) |
| Trim roll inc | Rolls vehicle to the right (Heavy only) |
| Trim roll dec | Rolls vehicle to the left (Heavy only) |
| Input hold set | holds current controller input |
| Roll pitch toggle | Changes roll pitch control mode |
| Actuator # max momentary * | Opens Newton Gripper |
| Actuator # min momentary * | Closes Newton Gripper |
| *Where # is the actuator number assigned to the output channel. | |
Next Steps
Your BlueROV2 is now fully set up and ready to dive. From here, check out the Operator’s Guide to learn how to pilot your ROV and get the most out of your first dives.
If you run into any issues along the way, contact our technical support team for more help.