
Ping Echosounder Sonar User Manual
By Jacob
Introduction
The Blue Robotics Ping Echosounder and Altimeter is a low-cost underwater sonar that measures the distance to objects underwater. The Ping has a 100 meter range, 25 degree beam width, and 300 meter depth rating. It can be used as an altimeter on an ROV or AUV, for bathymetric surveys aboard a USV or boat, or as an obstacle avoidance sonar for any marine robot. This guide provides general operating principles and guidance on how to use the sonar and the Ping Viewer sonar interface.
Operating Principle
The Ping device emits a brief 115 kHz acoustic pulse from the transducer at the face of the device. The device then listens back and measures the strength of returned acoustic energy. As the acoustic sound waves travel through water they reflect or echo off of solid objects and then travel back to the device. The Ping then calculates the distance to the object with the equation:
distance = known speed of sound in water * (measured time for echo to return / 2).
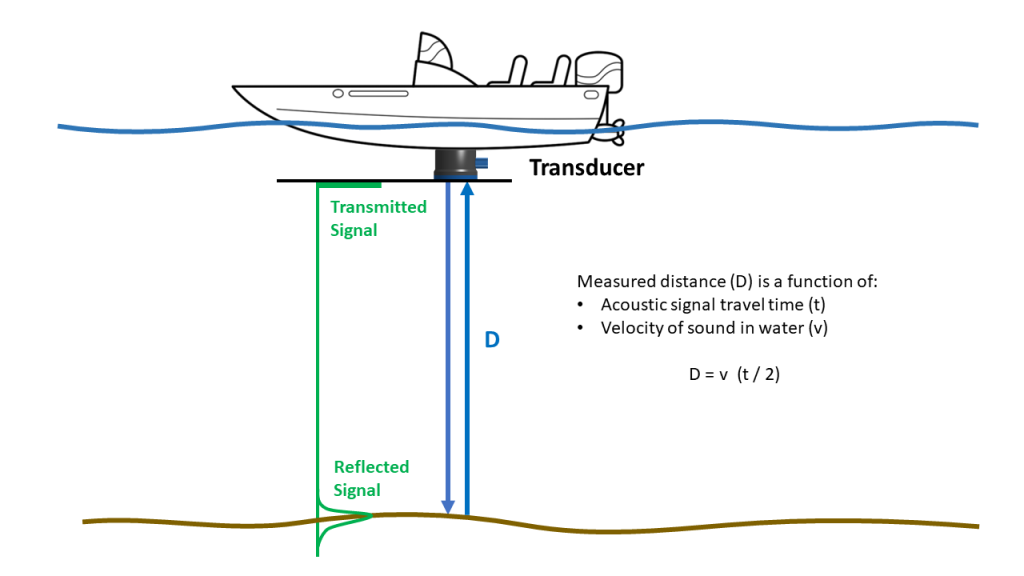
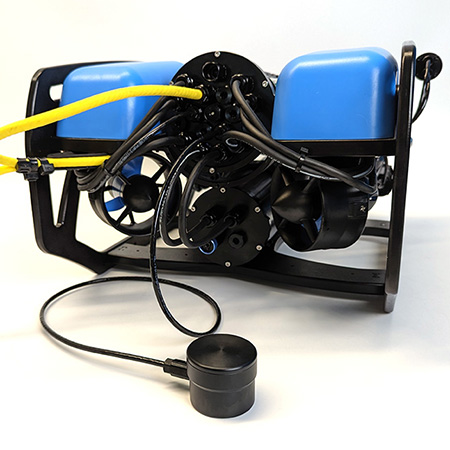
Theory of operation for an echosounder device like the Ping.
For more information on how an echosounder sonar works, check out the Wikipedia articles on echo sounding and fishfinders.
Target Tracking Algorithm
The sonar runs a tracking algorithm that attempts to lock on to the most significant target in view of the device. This is usually the seafloor if the sonar is pointed downwards but can also be a large object in its view or a wall or the water’s surface if it’s not pointed down.
The tracking algorithm is designed to track a flat face but it may also be used as a general purpose proximity sensor. The algorithm for determining the target considers return strength (the strongest return is likely the target) and past measurements (ie. a low pass filter).
The tracking algorithm also produces a confidence measurement corresponding to the probability that it has correctly identified the target. In noisy environments with a low signal-to-noise ratio, the confidence of the target lock may be reduced.
Distance and Profile Output
The Ping outputs the distance to the most likely target with the associated confidence.
It also outputs profile data samples, which consist of 200 signal strength measurements sampled at regular distance intervals across the current range. These profile samples provide a more detailed view of what might be in front of the Ping device. With the profile data you can see fish in the water, determine if the device is picking up multiple reflections or interference from other acoustic devices, and possibly differentiate between substrate material like bare sand versus plant life.
Configurable Settings
There are several user-configurable settings on the Ping device. All of the device settings except for the “Device ID” are reset to the factory default configuration after reset. This table shows the default settings:
| Ping Device Setting | Description | Factory Default Value |
|---|---|---|
| Device ID | The device id (0~254) | 1 |
| Speed of Sound (mm/s) | The speed of sound to use for distance calculations | 1500000 |
| Ping interval (ms) | The minimum time interval between each acoustic transmission. The actual time interval may be greater depending on the scan range. | Automatic |
| Acoustic pulse duration* | The transducer excitement duration for each acoustic transmission | User configuration not yet supported |
| Receiver gain* | The receiver gain | Automatic |
| Scan range* | The minimum + maximum range window to sample | Automatic |
| Acoustic output enabled | Enable/disable acoustic transmissions | Enabled |
| Automatic mode | Enable/disable automatic scan range and gain adjustment | Enabled |
| Continuous output mode | Enable/disable asynchronous output data stream | Disabled |
Device Behavior Overview
This diagram provides a high-level look at what the Ping is thinking internally. Most users won’t need this but it can help to provide more detail and clarity if you’re trying to understand the device behavior.
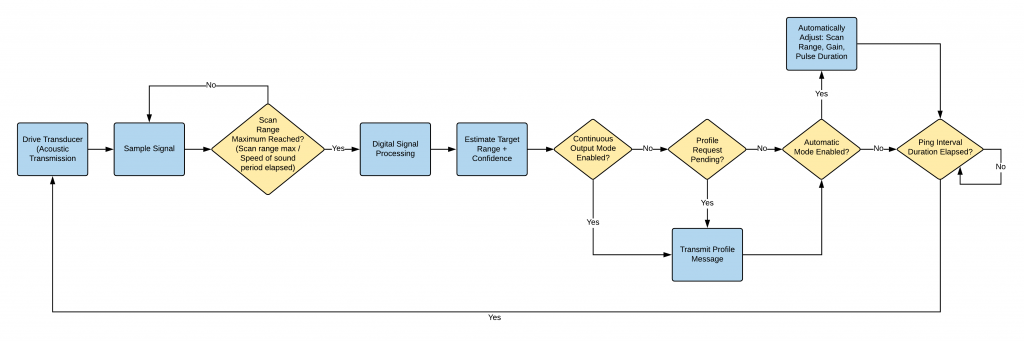
Ping internal logic diagram.
Communication Interface
The Ping sonar communicates with a serial UART using a binary communication protocol called Ping Protocol.
The communication protocol is publicly available and documented here on the Ping Protocol page. The default baud rate is 115200 when the device powers on, and the baud rate can be renegotiated via an auto baud rate procedure to be between 9600 and 3M baud.
The device operates as a slave in a synchronous master-slave configuration so that the device will only send data when requested by the master. The device can thus be used with half-duplex serial interfaces like RS485 when it is connected to an appropriate TTL serial converter. (The UART on the Ping Echosounder device is only capable of TTL serial levels between 0 and +5V; connecting the Ping Echosounder directly to an RS485 or RS232 interface will damage the device). Half-duplex serial interfaces can greatly increase the wire length used for communications.
When message data is requested from the device, the device immediately responds with the most recent data. The only exception is requesting a profile message, in which case, the device will respond as soon as the next profile data has been processed.
To improve performance and update rates, the device can also be configured in an asynchronous mode to output a continuous stream of profile data messages. (This mode requires a full-duplex serial interface).
Device Configuration Application Examples
Synchronous/Polled Mode
The default device configuration after reset is synchronous mode. The device operates as a slave in a master-slave network, and it will only transmit data when requested by a master.
- Send device information request
- Wait for response
- Send set_device_settings() (ping rate, range, auto mode)
- Wait for response
- Send profile request (repeat)
- Wait for response; go to Step 5
Asynchronous/Continuous Output Mode
In order to reduce latencies and communication overhead, the device can be configured to output a continuous profile data stream. This mode should not be used on half-duplex serial links as it will result in RX/TX data collisions.
- Send device information request
- Wait for response
- Send set_device_settings() (ping rate, range, auto mode)
- Wait for response
- Send continuous control
- Wait/receive data stream
Supporting Software
Blue Robotics provides and maintains a rich suite of supporting open source software and documentation for the Ping Echosounder:
- Ping-Viewer: Open source plug and play GUI application designed to work with the Ping Echosounder and other devices.
- ping-firmware: This repository contains the firmware binaries that run on Ping Echosounder. This repository also provides a public forum for submitting and tracking bug reports and feature requests.
- ping-protocol: Specification and message definitions for communicating with the Ping Echosounder.
- ping-cpp, ping-python, ping-arduino: supporting libraries, message apis, device apis, tools, and examples for working with the Ping Echosounder and other devices.
- ArduSub Companion: Companion has plug-and-play support for the Ping Echosounder. Companion automatically connects the Ping Echosounder to both Ping-Viewer and ArduPilot.
- Ardupilot: The Ping Echosounder can be used as a rangefinder in ArduBoat (ArduRover). The setup instructions are here :
Firmware Updates
Firmware Binaries
Unlike many other Blue Robotics products, the Ping Echosounder firmware is not open-source but we maintain a repository with open access to the compiled firmware files.
Firmware binaries are available at ping-firmware GitHub repository.
Firmwares are available for 115200 and 9600 baud communication. The 115200 baudrate firmware should be used for most applications.
Update via Direct USB
The device firmware can be upgraded by the Ping Viewer application.
Download the application, and refer to the Firmware Update section.
- Open the Ping Viewer application, and connect the device to your computer USB port with a UART-USB adapter like the BLUART.
- Select the Ping Echosounder device in Ping Viewer, then open the firmware update menu.
- Choose automatic update, and click ‘update firmware’.
- Wait for the process to complete before closing Ping Viewer or unplugging the device from your computer.
Update via Companion Web Interface (BlueROV2 Installations)
If the device is installed on a BlueROV2, the companion web page may be used to update the device firmware.
- Download the 115200 baud firmware and save it to your computer.
- Power on the BlueROV2, visit https://192.168.2.2:2770/ping.
- Click ‘Choose File’.
- Choose the firmware file on your computer, then click ‘Update’.
- Wait for the process to complete before closing the webpage or turning off the BlueROV2.
Device Recovery
If a firmware update is interrupted, the device will no longer boot or function correctly.
Follow the steps in the Device Recovery section of the Ping Viewer documentation.
Related Guides
Using the Ping Sonar with an Arduino
Ping Installation Guide for the BlueROV2
Authors

Jacob
Jacob is the lead software engineer at Blue Robotics and one of the founders of the ArduSub open source subsea vehicle control project. In addition to being an awesome programmer he has a degree in chemistry and a background in marine robotics for coral reef surveys.